MDSCuit Twitter Client for Desktop

1 Comment

You know that open twitter on browser in office is not so good, especially when you late to to press alt+tab when the boss coming lol šŸ˜€ , I found some twitter desktop client but most of them is gonna suck the wallet, the free one not so reliable, too much for what I need, etc so I decide to make my own twitter desktop client with java and using twitter4J as it API. At first I only want to make simple app to show me my home timeline, but then it gettingĀ interesting and makes develop this far. Because it developed with java, so this application as crossplatform as java, you can use it on Windows, Linux, Solaris & Mac OS as long as your system have JRE (Java Runtime Environment) installed. For windows and linux user you can check it with command prompt or console by write java – versionĀ , if your system have JRE installed you will see response like picture below :

javaVersion

If your system don’t have JRE, then you can download it from here. If you already have JRE installed, what you need is just download MDSCuit from my Box then use it without any installation, just double click on MDSCuit.jar or use java -jar MDSCuit.jar from command prompt or console.

MDSCuit still using tokenizer login, not very user friendly, Twitter say “Such applications include desktop applications or mobile application where standard web OAuth flow or PIN-code out-of-band flow is not an option” , but this only way to make it able to log-in (with different user beside me with my token secret) for now until xAuth access for this application approved.
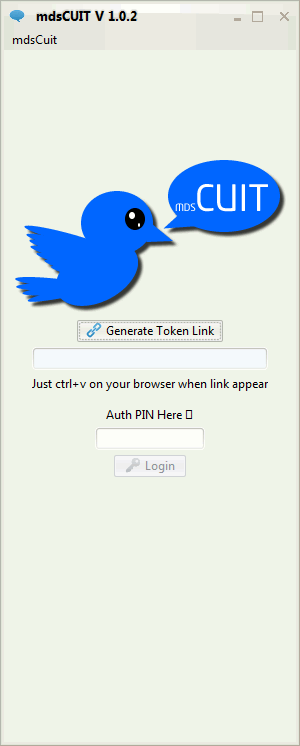
login_0

First you need to push Generate Token LinkĀ and you will be get a link like picture below :
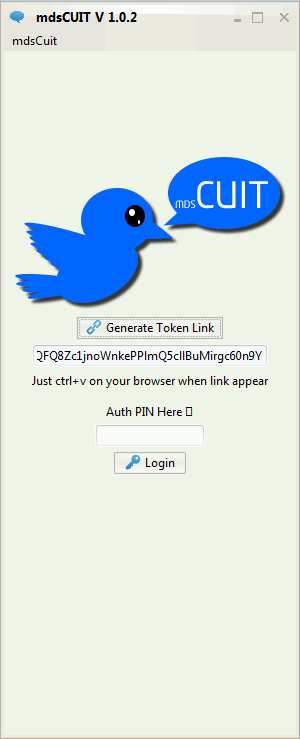
login_1

Actually you can just paste the link in your browser because the link actually copied in your clipboard, but in case you lose it you can still select it and ctrl+c then paste on your browser. If you logged into twitter you will have to just click Authorize AppĀ , if you not then you should provide your id and password and click it.

login_2

After Authorize MDSCuit, you will get PIN, copy or write the pin into MDSCuit and push Log In.
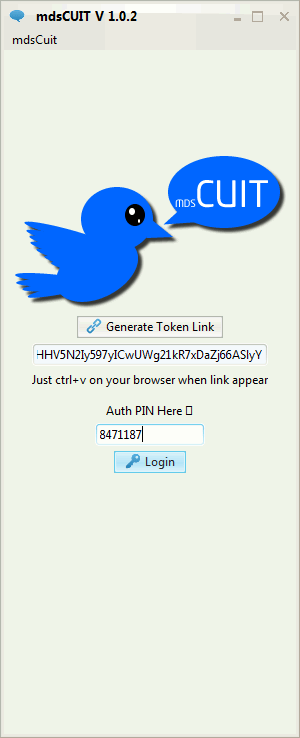
login_4

If you put the correct PIN then you will be able to use MDSCuit, it will be take a while to log-in at first time its up to your internet connection speed actually. With MDSCuit you can see your hometime, post and reply like picture below :
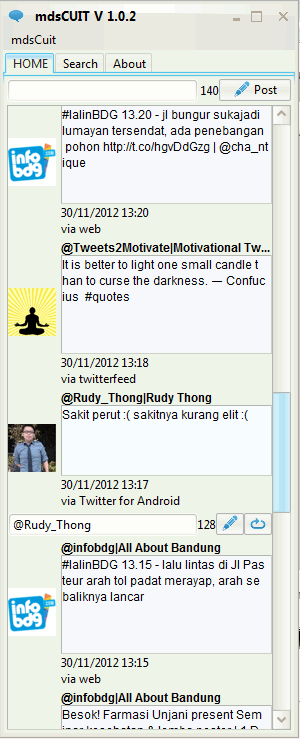
home

You can also searching and reply from searching menu :
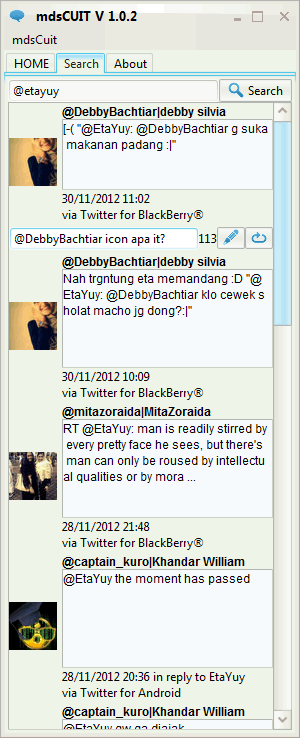
reply_search

If you click X button, MDSCuit will be minimized to system tray but you will be know if any new unread twit from tray icon.
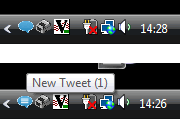
systray_notif

To fully exit the app (and log out)Ā , just right click the tray or click menu mdsCuit>Exit. This program still in very early Ā developed, I not expect bug/error but if you found one, I glad to know and I’ll try to fix.

Download JRE

Download MDSCuit

Change log :

Beta Version
+Read home timeline

Version 1.0.1
+Show twitter profile picture
+Search Feature

Version 1.0.2
+Post twit/status
+Tokenizer login
+System tray
+Asynchronous timeline fetcher (replacing 'Refresh' button & autofetch scheduler)
+Reply twit
+Retweet
+Minor bug fixes

Version 1.0.3
+Click picture for user detail

Subscribe & fast response :

Swing Hack – Auto Complete Text Field

4 Comments

Have a lot of items in combo box makes user irritated when running the program, especially when fast input is needed, manual search by scrolling down the scroll bar is so time consuming but can be avoided if we can get what item we want to choose by just write first or second letter of it. In another case you maybe want to make a text field with some suggestion input like search engine text field. To make something like that, we need JTextField and JComboBox together as one.

Custom JComboBox :

import java.awt.event.ItemEvent;
import javax.swing.DefaultComboBoxModel;
import javax.swing.JComboBox;
import javax.swing.plaf.basic.BasicComboBoxEditor;

public class AutoComboBox extends JComboBox {
private class AutoTextFieldEditor extends BasicComboBoxEditor {

private AutoTextField getAutoTextFieldEditor() {
return (AutoTextField) editor;
}

AutoTextFieldEditor(java.util.List list) {
editor = new AutoTextField(list, AutoComboBox.this);
}
}

public AutoComboBox(java.util.List list) {
isFired = false;
autoTextFieldEditor = new AutoTextFieldEditor(list);
setEditable(true);
setModel(new DefaultComboBoxModel(list.toArray()) {

protected void fireContentsChanged(Object obj, int i, int j) {
if (!isFired)
super.fireContentsChanged(obj, i, j);
}

});
setEditor(autoTextFieldEditor);
}

public boolean isCaseSensitive() {
return autoTextFieldEditor.getAutoTextFieldEditor().isCaseSensitive();
}

public void setCaseSensitive(boolean flag) {
autoTextFieldEditor.getAutoTextFieldEditor().setCaseSensitive(flag);
}

public boolean isStrict() {
return autoTextFieldEditor.getAutoTextFieldEditor().isStrict();
}

public void setStrict(boolean flag) {
autoTextFieldEditor.getAutoTextFieldEditor().setStrict(flag);
}

public java.util.List getDataList() {
return autoTextFieldEditor.getAutoTextFieldEditor().getDataList();
}

public void setDataList(java.util.List list) {
autoTextFieldEditor.getAutoTextFieldEditor().setDataList(list);
setModel(new DefaultComboBoxModel(list.toArray()));
}

void setSelectedValue(Object obj) {
if (isFired) {
return;
} else {
isFired = true;
setSelectedItem(obj);
fireItemStateChanged(new ItemEvent(this, 701, selectedItemReminder,1));
isFired = false;
return;
}
}

@Override
protected void fireActionEvent() {
if (!isFired)
super.fireActionEvent();
}

private AutoTextFieldEditor autoTextFieldEditor;

private boolean isFired;

}

Custom JTextField :

import java.util.List;
import javax.swing.JTextField;
import javax.swing.text.*;

public class AutoTextField extends JTextField {
 class AutoDocument extends PlainDocument {

public void replace(int i, int j, String s, AttributeSet attributeset)
 throws BadLocationException {
 super.remove(i, j);
 insertString(i, s, attributeset);
 }

public void insertString(int i, String s, AttributeSet attributeset)
 throws BadLocationException {
 if (s == null || "".equals(s))
 return;
 String s1 = getText(0, i);
 String s2 = getMatch(s1 + s);
 int j = (i + s.length()) - 1;
 if (isStrict && s2 == null) {
 s2 = getMatch(s1);
 j--;
 } else if (!isStrict && s2 == null) {
 super.insertString(i, s, attributeset);
 return;
 }
 if (autoComboBox != null && s2 != null)
 autoComboBox.setSelectedValue(s2);
 super.remove(0, getLength());
 super.insertString(0, s2, attributeset);
 setSelectionStart(j + 1);
 setSelectionEnd(getLength());
 }

public void remove(int i, int j) throws BadLocationException {
 int k = getSelectionStart();
 if (k > 0)
 k--;
 String s = getMatch(getText(0, k));
 if (!isStrict && s == null) {
 super.remove(i, j);
 } else {
 super.remove(0, getLength());
 super.insertString(0, s, null);
 }
 if (autoComboBox != null && s != null)
 autoComboBox.setSelectedValue(s);
 try {
 setSelectionStart(k);
 setSelectionEnd(getLength());
 } catch (Exception exception) {
 }
 }

}

public AutoTextField(List list) {
 isCaseSensitive = false;
 isStrict = true;
 autoComboBox = null;
 if (list == null) {
 throw new IllegalArgumentException("values can not be null");
 } else {
 dataList = list;
 init();
 return;
 }
 }

AutoTextField(List list, AutoComboBox b) {
 isCaseSensitive = false;
 isStrict = true;
 autoComboBox = null;
 if (list == null) {
 throw new IllegalArgumentException("values can not be null");
 } else {
 dataList = list;
 autoComboBox = b;
 init();
 return;
 }
 }

private void init() {
 setDocument(new AutoDocument());
 if (isStrict && dataList.size() > 0)
 setText(dataList.get(0).toString());
 }

private String getMatch(String s) {
 for (int i = 0; i < dataList.size(); i++) {
 String s1 = dataList.get(i).toString();
 if (s1 != null) {
 if (!isCaseSensitive
 && s1.toLowerCase().startsWith(s.toLowerCase()))
 return s1;
 if (isCaseSensitive && s1.startsWith(s))
 return s1;
 }
 }

return null;
 }

public void replaceSelection(String s) {
 AutoDocument _lb = (AutoDocument) getDocument();
 if (_lb != null)
 try {
 int i = Math.min(getCaret().getDot(), getCaret().getMark());
 int j = Math.max(getCaret().getDot(), getCaret().getMark());
 _lb.replace(i, j - i, s, null);
 } catch (Exception exception) {
 }
 }

public boolean isCaseSensitive() {
 return isCaseSensitive;
 }

public void setCaseSensitive(boolean flag) {
 isCaseSensitive = flag;
 }

public boolean isStrict() {
 return isStrict;
 }

public void setStrict(boolean flag) {
 isStrict = flag;
 }

public List getDataList() {
 return dataList;
 }

public void setDataList(List list) {
 if (list == null) {
 throw new IllegalArgumentException("values can not be null");
 } else {
 dataList = list;
 return;
 }
 }

private List dataList;

private boolean isCaseSensitive;

private boolean isStrict;

private AutoComboBox autoComboBox;
}

Now here is how to use em :

import java.awt.*;
import java.awt.event.*;
import java.util.*;
import javax.swing.*;
import javax.swing.text.*;

public class AutoComplete extends JComboBox implements JComboBox.KeySelectionManager
{
 private String searchFor;
 private long lap;
 public class CBDocument extends PlainDocument
 {
 @Override
 public void insertString(int offset, String str, AttributeSet a) throws BadLocationException
 {
 if (str==null) return;
 super.insertString(offset, str, a);
 if(!isPopupVisible() && str.length() != 0) fireActionEvent();
 }
 }
 public AutoComplete(Object[] items)
 {
 super(items);
 lap = new java.util.Date().getTime();
 setKeySelectionManager(this);
 JTextField tf;
 if(getEditor() != null)
 {
 tf = (JTextField)getEditor().getEditorComponent();
 if(tf != null)
 {
 tf.setDocument(new CBDocument());
 addActionListener(new ActionListener()
 {
 public void actionPerformed(ActionEvent evt)
 {
 JTextField tf = (JTextField)getEditor().getEditorComponent();
 String text = tf.getText();
 ComboBoxModel aModel = getModel();
 String current;
 for(int i = 0; i < aModel.getSize(); i++)
 {
 current = aModel.getElementAt(i).toString();
 if(current.toLowerCase().startsWith(text.toLowerCase()))
 {
 tf.setText(current);
 tf.setSelectionStart(text.length());
 tf.setSelectionEnd(current.length());
 break;
 }
 }
 }
 });
 }
 }
 }
 public int selectionForKey(char aKey, ComboBoxModel aModel)
 {
 long now = new java.util.Date().getTime();
 if (searchFor!=null && aKey==KeyEvent.VK_BACK_SPACE && searchFor.length()>0)
 {
 searchFor = searchFor.substring(0, searchFor.length() -1);
 }
 else
 {
 if(lap + 1000 < now)
 searchFor = "" + aKey;
 else
 searchFor = searchFor + aKey;
 }
 lap = now;
 String current;
 for(int i = 0; i < aModel.getSize(); i++)
 {
 current = aModel.getElementAt(i).toString().toLowerCase();
 if (current.toLowerCase().startsWith(searchFor.toLowerCase())) return i;
 }
 return -1;
 }

 @Override
 public void fireActionEvent()
 {
 super.fireActionEvent();
 }

public static void main(String arg[])
 {
 JFrame f = new JFrame("AutoCompletion");
 f.setDefaultCloseOperation(JFrame.EXIT_ON_CLOSE);
 f.setSize(300,100);
 Container cp= f.getContentPane();
 cp.setLayout(new GridLayout(2, 1));

 Locale[] locales = Locale.getAvailableLocales();
 //JComboBox 1 allowing any input
 JComboBox cBox= new AutoComplete(locales);

 java.util.List<String> items = new ArrayList<String>(){};
 for (int i = 0; i < locales.length; i++) {
 items.add(locales[i].toString());
 }

//JComboBox 2 with strict input
 JComboBox cBox2 = new AutoComboBox(items);
 cBox.setBounds(50,50,100,21);
 cBox.setEditable(true);
 cp.add(cBox);
 cp.add(cBox2);
 f.setVisible(true);
 f.setResizable(false);
 f.setLocationRelativeTo(null);
 }
}

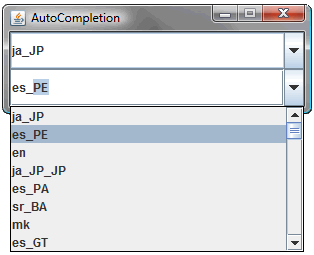
Combo box 1 will become text field like you can found in search engine, when you write something inside of the text field, it will give you suggestion based on item of combo box which have common letter sequence. Combo box 2 also like search engine text field but strictly only allowing write something that exist in combo box item.

Subscribe & fast response :

How to End a Relationship

Leave a comment

How unfortunately you landed here, but a dead end relationship must put to it end for the best of both. Sometimes end a relationship not as smooth as start it, there’s feeling guilty haunting me especially when try to end relationship with a good girl, while sometimes a relationship is must to put to the end for some reason like no more love, not in the same wavelength etc. For those who in position get dumped, believe me sometimes make decision and become the person who say “end” is painful and hard too (!), sometimes those who say “end” first is just act tough and leaving when actually feel the same way. The main point of this article is how to end a relationship without feeling guilty, as little pain as possible for both and make a clean end or even become looks like you are the one who get dumped. Doing actual break up is nerve racking and need a lot courage since people’s heart put int the line here. I didn’t say this gonna be proper way, in reverse this actually gonna be unfair way but at least somehow comprehend our main point and purpose, if you want to get proper way find it out there, now let’s get started.

Ā·HOWĀ·

  • Drift Apart : Become busy, stop calling, stop texting, stop any network social networking activity between you and her/him, etc. Eventually your partner will lose her/his feeling then also do the same and you can just say end easily or even your partner will gonna say it first.
  • Boring : This is reverse of Drift Apart, become boring person, show more attention & love extraordinarily, if she/he not a lover but a player, she/he will be bored of you and decide to leave you. Warning : beware some of player will take advantage of it.
  • Put a Threat : Put a threat or make a threat, make her/his doing a mistake to put in the table as the reason that relationship should be end. Make some status for anonymous, make she/he jealous with your friendship to another people or anything that leading to make her/him doing mistake or even cheat on you, catch her/him in act (don’t ask me how) and make it a reason.
  • Bad Rumor : Spread or make bad rumor about you, anything who make your partner ill feel.

Ā·TIPSĀ·

  • First and most important, be certain you want to end your relationship, remember how hard you get his/her attention and become your partner in the past, if you not sure then don’t !
  • Don’t take anything personally, control your emotion, you are the one who want to make it end, anything she/he do you is reaction of your action.
  • If you the one that will say “end”, better do it on phone to avoid any tragically shameless things happen in location.
  • Don’t try to remain friend, especially if you regret and you can’t control your own feeling because it will be prolong agony of breakup. Most often, it best to spend time apart. After a time, perhaps three months, perhaps a year or more, when you see one another, it won’t hurt as much, and maybe then you can try to be friends with a clean slate.
  • Gratitude, both of you are lover once, thanks your ex for ever being nice and kind to you.

That’s it,Ā  thanks for reading, actually I wrote this article but I hope nobody will read it or cancel your intention after read first tips, cause I believe any breakup with any method is sadness thing for both or one side, think and rethink before do it. šŸ™‚

NB : Use the method at your own risk!

Subscribe & fast response :

Rubber Duck Debugging dan Curhat

1 Comment

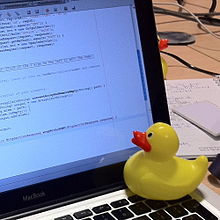
Apa sih rubber duck debugging, lalu apa sih hubungannya dengan curhat (curahan hati)? Mungkin itu pertanyaan pertama yang terlintas di sebagian besar orang yang khususnya yang belum mengetahui apa itu rubber duck debugging. Rubber duck sendiri ialah boneka bebek yang terbuat dari karet yang biasa dipakai mainan anak kecil untuk menemaninya mandi, untuk sebagian orang rubber duck ini menjadi benda lucu yang dipakai menjadi mainan genggam yang dibawa kemana-mana, accessories bahkan pajangan di meja kerja. Lalu apa rubber duck debugging itu? Konon dahulu kala (beuuh) ada seorang programmer yang menjelaskan baris demi baris source code dan metoda pemprograman yang dia gunakan kepada boneka bebeknya saat mengalami masalah seperti bug, error atau response yang tidak diharapkan lainnya yang tidak kasat mata. Metode monologue (percakapan satu arah) ini terbukti bekerja dan menjadi salah satu metoda standar debugging. Saya sendiri sering melakukan rubber duck debugging, namun bedanya dengan teman kerja, sebagian besar akar masalah dan solusi dapat ditemukan dengan sendirinya bahkan sebelum pendengar memberi pendapatnya.

Rubber ducking debugging menjadi semakin baik disaat pendengar memiliki pengalaman dibidangnya dan memberikan pertanyaan yang kritikal terkait dengan masalah yang tengah dihadapi dan membuat pembicara menyadari kesalahannya kemudian menemukan solusi yang tepat. Lalu bagaimana dengan curhat? Curhat dilakukan disaat pembicara memiliki masalah dalam kehidupannya, apakah itu ekonomi, asmara dan sebagainya. Namun berbeda dengan rubber duck debuggingĀ , tidak banyak curhat yang membuahkan solusi yang tepat, mengapa demikian?

  • Rubber duck debugging fokus pada intropeksi diri, menceritakan tentang apa yang dilakukan / source code apa yang ditulis kedalam program, sedangkan sebagian besar curhat fokus terhadap response atau yang dialami oleh pembicara, menceritakan orang lain yang berbuat tidak diinginkan kepada dirinya dan sebagainya bukan apa yang dilakukan si pembicara sebelum menerima response yang tidak diinginkan.
  • Percakapan menjadi sebuah dialog, pendengar terlalu banyak memberi pendapat yang membuat pembicara lupa untuk fokus intropeksi diri, ditambah lagi pendengar tersebut bukan seorangĀ  yang cukup berpengalaman dengan hal yang dialami pembicara, dan pada dasarnya masalah yang berurusan dengan manusia (yang notabenenya unik) tidak ada yang benar-benar bisa memahami sepenuhnya, apalagi orang yang tidak berhadapan langsung dengan masalah tersebut. Seorang psikolog sekalipun lebih banyak diam dan sesekali bertanya kepada pasiennya dibanding banyak bicara.

Jadi bagi yang ingin curhat yang bermutu, ada baiknya fokus intropeksi terhadap apa yang dilakukan sebelum menerima response yang tidak diinginkan dan pilih pendengar yang sebaik mungkin. Ingatlah, hal baik maupun buruk yang menimpa kita sebagian besar ialah disebabkan oleh perbuatan diri kita sendiri (!) Semoga bermanfaat.

Subscribe & fast response :

Step by step Jasper Report Tutorial II – Variable Expression

4 Comments

Sebelum terus membaca tutorial ini saya sarankan untuk terlebih dahulu membaca Step by step Jasper Report Tutorial . Di tutorial sebelumnya sudah saya terangkan dasar-dasar dari Jasper Report dan iReport serta pemanggiilannya dengan aplikasi java, oleh karena itu dalam tutorial ini saya hanya akan menerangkan beberapa penggunaan Variables (fx) bawaan iReport atau custom Variables.

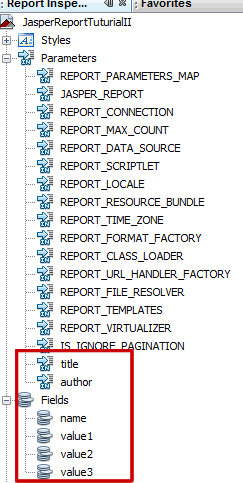
FXPanel

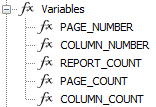
Variables (fx) panel terletak didalam Report Inspector, tujuan variable ini ialah untuk mempermudah pembuatan report misal untuk menangani halaman dapat menggunakan variable PAGE_NUMBER , menangani jumlah total halaman dapat menggunakan variable PAGE_COUNT, menangani total column dapat menggunakan variable COLUMN_COUNT dan seterusnya. Hanya dengan menempatkan (drag and drop) variable ini didalam Designer window, maka secara otomatis nilainya akan di diberikan oleh jasper saat report dicetak. Kita juga dapat membuat custom variable sendiri, misal yang bertujuan untuk menghitung nilai total dari suatu kolom atau beberapa kolom yang dipilih. Untuk mengetahui cara penggunaannya mari langsung saja ke langkah demi langkah pembuatan report menggunakan variable.

Pertama-tama buat Parameters author dan title dengan default Parameter Class java.lang.String , lalu buatĀ Fields name, value1, value2, value3. Rubah Parameter Class value1, value2 dan value3 menjadi java.lang.Integer.

Parameters and Fields

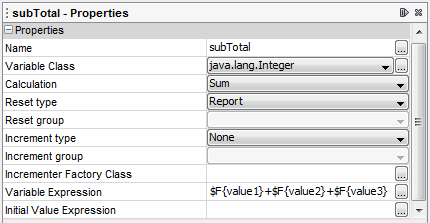
Selanjutnya mulai membuat custom Variables menggunakan ekspresi dari Fields tadi. Pada panel Variables klik kanan dan pilih Add Variable , buat dua variable yaitu subTotal dan Total. Klik variable subTotal, di Properties rubah Calculation menjadi Sum , Variable Class menjadi java.lang.Integer kemudian edit ekspresinya menjadi $F{value1}+$F{value2}+$F{value3} sedangkan untuk variable total Calculation juga Sum dan Variable Class java.lang.Integer namun dengan ekspresi $V{subTotal} .

subTotal Properties

Sekarang drag and drop Parameters, Fields dan Variables yang telah dibuat bersama Static Text dan Line sehingga seperti gambar dibawah ini.

Perlu diperhatikan untuk bagian total menggunakan Group Footer dengan Group Exspression $V{PAGE_NUMBER} , hal ini dilakukan untuk menghindari terciptanya ruang kosong antara detail dan total disaat jumlah record yang dituliskan tidak memenuhi panjang template yang sedang digunakan. Adapun cara membuat Group Footer ialah dengan cara klik kanan nama project dalam Report Inspector lalu pilih Add Report GroupĀ , beri nama lalu pilih Group by the following Expression dan isi ekspresinya dengan $V{PAGE_NUMBER} .

Setelah selesai mendesain report, compile project (jrxml) sehingga menghasilkan file jasper.

Langkah selanjutnya ialah membuat aplikasi java yang akan menggunakan jasper yang telah dibuat. Tambahkan library jasper yang dibutuhkan kedalam project (list library ada dalam tutorial sebelumnya) , lalu ikuti source code dibawah ini :

package mds.tutorial.jasperreport;

import java.util.ArrayList;
import java.util.HashMap;
import java.util.List;
import java.util.Map;
import java.util.logging.Level;
import java.util.logging.Logger;
import net.sf.jasperreports.engine.JRException;
import net.sf.jasperreports.engine.JasperFillManager;
import net.sf.jasperreports.engine.JasperPrint;
import net.sf.jasperreports.engine.data.JRBeanCollectionDataSource;
import net.sf.jasperreports.view.JasperViewer;

/**
*
* @author Meihta Dwiguna Saputra
*/
public class Main {

    public static void main(String[] args) {
        List<Whatever> whatevers = new ArrayList<Whatever>();
        for (int i = 0; i < 10; i++) {
            Whatever whatever = new Whatever();
            whatever.setName("Meihta Dwiguna Saputra");
            whatever.setValue1(i);
            whatever.setValue2(i+i);
            whatever.setValue3(i+i+i);
            whatevers.add(whatever);
        }
        try {
            JasperPrint jasperPrint = new Main().generatePscSellingRecapSummary(whatevers, "Step by step Jasper Report Tutorial II ā€“ Variable Expression", "mdsaputra.wordpress.com");
            JasperViewer jv = new JasperViewer(jasperPrint, true);
            jv.setVisible(true);
        } catch (JRException ex) {
            Logger.getLogger(Main.class.getName()).log(Level.SEVERE, null, ex);
        }
    }

    public JasperPrint generatePscSellingRecapSummary(List<Whatever> whatevers, String title, String author) throws JRException {
        String jasperFile = "JasperReportTuturialII.jasper";
        Map params = new HashMap();
        JRBeanCollectionDataSource dataSource = new JRBeanCollectionDataSource(whatevers);

        params.put("title", title);
        params.put("author", author);

        //Berbeda dengqn tutorial sebelumnya, pada tutorial ini kita tidak menggunakan JREmptyDataSource()
        //karena dijasper tidak menggunakan table dataset yang diisi nilainya melalui map params
        JasperPrint printer = JasperFillManager.fillReport(getClass().getResourceAsStream(jasperFile), params, dataSource);
        return printer;
    }
}

Jangan lupa membuat Class POJO Whatever.java dengan attribute name (String), value1 (int), value2 (int) dan value3 (int) lengkap dengan encapsulation (setter-getter). Jika aplikasi dibuat dengan benar maka akan menghasilkan seperti gambar dibawah ini saat dijalankan :

Terimakasih telah membaca, semoga tutorial diatas membantu šŸ˜‰ .

Project dapat di download di MDSaputra’s Box dengan password : mdsaputra

Subscribe & fast response :

Older Entries